Installing a deck is a major project that requires a significant investment. It also requires a commitment to consistent maintenance to keep it safe and attractive.
Begin by excavating holes for the caissons, which support the deck. Next, pour concrete and allow it to cure. Install joist hangers every six inches along the end beam and ledger board. Uncover more at https://www.mountjoycompany.com.
The planning phase is a vital part of any deck project. It’s where you determine the size, shape, and location of your new deck and what features you want to include. It’s also where you choose the materials you will use and obtain any necessary permits. During this stage, you should also clear the site and install footings or piers for support. Getting this step right is crucial to ensure the integrity of your deck. If the foundations aren’t set correctly, your deck could end up sagging or even collapsing.
This is also the time to consider your budget and what type of deck you can afford given the available space on your property. You may also need to submit your plans to your homeowners’ association for approval, especially if you live in a community with strict building guidelines.
Once the footings or piers are in place, you can begin constructing the frame of your deck. This involves attaching the rim joists to the posts and securing them with fasteners. It’s important to use the right hardware for this task to ensure that the fasteners don’t rust or loosen over time.
You should also measure for and install joist hangers, which are the fasteners that hold the beams in place. It’s essential to get this part of the process correct because joist hangers provide most of the structural integrity beneath your deck boards. If you’re not sure how to do this properly, it’s a good idea to hire a professional. They’ll know exactly what measurements and specifications to follow to ensure that your deck is strong and safe. They’ll also make sure that the joists are properly supported and aligned with your home.
Designing
The design phase is the foundation upon which your deck will be built. It involves planning where to situate the deck, laying out the dimensions and layout, and making sure it adheres to regional building codes. It also requires selecting a material that will hold up well to the elements and suit your architectural style.
During the designing process, it’s vital to determine whether or not you’ll need to secure a permit for your project. Depending on where you live, this step can be a bureaucratic inconvenience but it’s necessary to ensure your deck is constructed safely and up to code. Failure to do so could result in staggering fines or the requirement to demolish any unapproved work.
Next, it’s time to build the deck frame. This crucial step is akin to setting the skeleton of your deck and is a process that should be done with precision. Begin by securing the ledger board to the house, then installing rim and interior joists, spacing them accurately per your design plan. Secure each joist to the ledger with joist hangers and metal anchors.
Deck footings are cast or poured concrete pads that sit beneath the joists and spread the heavy load of your deck over a larger area of soil. They’re installed several inches below the frost line, a depth determined by your local building department. Failure to install these properly can cause your deck to sink into the ground, creating a dangerous condition.
When it comes to decking, there are many options available based on your desired style and budget. Pressure-treated lumber is cost-effective and durable, while composite materials offer greater versatility and longevity. Regardless of your choice, it’s important to follow manufacturer instructions for installation, including end gapping requirements.
Materials
The materials used to build a deck are a major factor in the overall cost and functionality of the project. The right decking material can enhance the appearance of a home and reduce maintenance costs. The type of material also influences how durable a deck will be.
Popular wood choices include cedar and redwood, which are rot and insect-resistant. However, they tend to be more expensive than pressure-treated lumber. Some specialty woods, such as ipe and tigerwood, are also available but will significantly increase the cost of the deck.
Pressure-treated wood is permeated with chemicals that repel insects, inhibit mold and mildew, and protect against rot. This type of wood is less expensive than cedar or redwood but can splinter and requires regular resealing. When working with this type of wood, safety precautions should be taken, including wearing a mask to avoid breathing in the chemical vapors. In addition, scraps should never be burned to prevent toxic fumes from escaping into the air.
Other alternatives to natural wood are synthetic decking products, which are made from recycled plastics and/or wood fibers. They are molded into a variety of shapes and sizes and come in many colors. They are generally less expensive than natural wood but may need to be resealed or painted periodically.
Other materials that are necessary for building a deck include joist hangers and fasteners. The type of metal required will vary depending on the material used for the joists. For example, galvanized screws are appropriate for use with common woods, while stainless steel fasteners are required for more durable types of decking. These fasteners should be rated for use in ground contact and be compatible with the material being used.
Substructure
Whether you’re planning an existing deck extension or a new build, it’s important to consider best substructure practices. The substructure consists of the joists, beams and posts that form the frame of the deck, and is crucial to your safety and the longevity of the decking material. The footings are below-ground concrete pillars that anchor the posts and help to distribute the weight of the deck over a larger area. They also protect the bottom of the post from freezing or thawing, which can cause shifting over time.
Ledger boards are horizontal framing pieces that attach the deck to the house, and should be installed meticulously to avoid damage to both structures. They also serve as a point of water and moisture entry, so it’s important to flash them properly. Fine Homebuilding provides a step-by-step guide for installing and flashing ledger boards, but it’s always a good idea to check with local building codes and the manufacturer’s instructions to ensure you’re doing it correctly.
Support posts are vertical lumber or metal components that connect the footings with the joists. Their placement and spacing is critical to the overall design of a deck, and requires careful consideration during both the planning and construction phases.
The joists are the main structural components of a deck, and their proper spacing is vital to the overall strength and stability of your deck. Joists that are spaced too far apart cannot bear the weight of the deck, and will eventually sag over time. To prevent this, you’ll want to use wood materials that are treated with eco-friendly preservatives to reduce their environmental impact. Pressure-treated Southern Yellow Pine (SYP) is an excellent choice for deck joists, as it’s strong and dense enough to withstand heavy foot traffic and harsh weather conditions.
Installation
Before constructing your deck, you must obtain any necessary building permits or homeowner association approvals. Failure to do so can lead to fines or other legal issues down the road. Once the permit is secured, clear the construction site by removing any rocks, debris, or other obstacles that could interfere with your project. Next, dig post holes to a depth of at least four feet below the frost line. Finally, install concrete footings to anchor the foundation of your deck.
Flashing and a ledger board are essential components to prevent water damage at the point where your deck connects to your house. To install flashing correctly, first cut a strip of flashing from aluminum or copper and apply construction adhesive to the wall. Then, affix the flashing to the wall and then up over the ledger board. After securing the flashing, fasten it to the ledger board with concealed-flange double joist hangers.
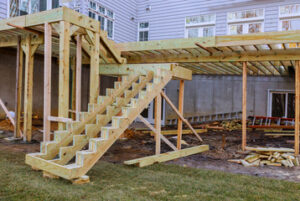
When installing stair stringers and treads, you must pay attention to their dimensions. They must be sized to meet your specific needs and conform to local building codes for safety. Additionally, you should consider incorporating handrails for additional support when using your deck.
Lastly, you must secure the field boards to your frame. This process can take anywhere from a few hours to a full day, depending on the design complexity and size of your deck. One tip April shares for securing field boards is to use spacers to ensure uniform gaps between them. This helps the deck maintain its stability and provides a more professional finish. In addition, it’s important to use a compound miter saw when cutting the ends of the field boards.